
Extractor fans work hard in kitchens and bathrooms, but when they quit, it’s a real hassle. If your fan buzzes, rattles, or stays silent, it doesn’t always mean you’re facing a total replacement. Sometimes, it’s just the motor that’s shot. Swapping the motor can save you serious cash if you know what you’re doing and have a few tools handy.
You don’t need to be an electrician, but you should feel comfortable with a screwdriver and a bit of patience. Most fan motors are held in by a few screws, some wiring, and maybe a stubborn grill. Before you spend money on a new unit, it’s worth checking if the motor swap is an option on your model. Some fans make replacement easy—others, not so much.
A quick tip: always double-check your fan’s brand and model. Replacement motors are rarely universal. Grab the manual or take a photo of the label before you buy anything. And remember, working with electricity means safety comes first—always turn off the power at the fuse box before you touch a single wire.
- How Do You Know the Motor’s the Problem?
- What You'll Need Before Getting Started
- Step-by-Step Motor Replacement Guide
- When to Call It Quits and Buy a New Fan
How Do You Know the Motor’s the Problem?
When your extractor fan starts acting up, it’s tempting to blame the whole unit. But the motor is the most common troublemaker. Spotting the signs early can save you from wasting money on a replacement you don’t need. So, what red flags point straight to the motor?
- Strange Noises: If your fan starts buzzing, grinding, or making a racket it never did before, the motor bearings might be worn out. A fan that grinds, groans, or clangs needs checking.
- No Power, Dead Silent: When you flip the switch and get nothing—not even a hum—that’s a red flag. As long as you know the breaker hasn’t tripped and there’s power at the wall, a dead fan nearly always points to the motor.
- Fan Turns On, Blades Don’t Move: Sometimes the motor tries to work, but the blades barely budge or stay still. This often means the motor’s coil is fried or there’s some internal damage.
- Burning Smells or Smoke: Any whiff of insulation or burnt plastic means the motor’s overheating. This is a big warning sign—shut the thing off immediately.
- Intermittent Operation: The fan cuts in and out or starts up only after you tap the casing. If a loose connection isn’t to blame, the motor is probably dying.
According to the UK’s Electrical Safety First, "Thirty percent of household extractor fan failures are linked directly to motor burnout or worn bearings."
“If your extractor fan is humming but not spinning, or shows obvious signs of overheating, it’s usually the motor at fault, not the wiring or switch.”
— Electrical Safety First, Homeowners’ Guide 2024
Here’s a handy table to help you spot typical fan problems and their likely causes:
| Symptom | Possible Cause |
|---|---|
| Buzzing Noise | Worn motor bearings |
| No Power | Dead motor, tripped breaker |
| Slow or No Spin | Seized motor |
| Burning Smell | Motor overheating |
| Works if Tapped | Loose motor connection |
If you run through these checks and all signs point to the motor, you’re on the right track. Just make sure you’ve ruled out a blown fuse, dodgy wall switch, or buildup of dust gumming up the blades before you start taking things apart. Getting specific with your diagnosis saves time and headaches during extractor fan repair.
What You'll Need Before Getting Started
Before you even touch the extractor fan, you want to round up the right tools and parts. Don’t skip this step—it’ll just slow you down if you realize halfway through that you’re missing something.
- Screwdrivers – Both Phillips and flathead since most fan units mix up screw types.
- Replacement motor – Double-check the model and specs. Bring your old motor or fan manual to the store if you’re shopping in person.
- Voltage tester – For checking if the circuit is actually dead before you mess with wires. They're cheap and save you from nasty surprises.
- Wire cutters/strippers – You’ll need these for swapping connections if your old motor is hardwired in.
- Needle-nose pliers – Handy for tight spots or fiddly wire connections.
- Dust mask and gloves – Dust and old grease are normal with older fans. Stay clean and avoid breathing in debris.
- Step stool or ladder – Especially for ceiling or high wall fans. Don’t teeter on a chair.
Still not sure if your tools will cut it? Here’s a quick table for the most common extractor fan setups:
| Fan Location | Common Tools Needed | Extra Supplies |
|---|---|---|
| Ceiling kitchen fan | Screwdrivers, ladder, wire cutters | Dust mask |
| Bathroom wall fan | Screwdrivers, pliers | Gloves, voltage tester |
| Inline duct fan | Screwdrivers, wire strippers | Cable ties |
One more thing—always have your smartphone handy. Snapping a few pics before pulling wires apart makes putting it all back together way less confusing. Trust me, you won’t regret it when you’re staring at a mess of colored wires later.
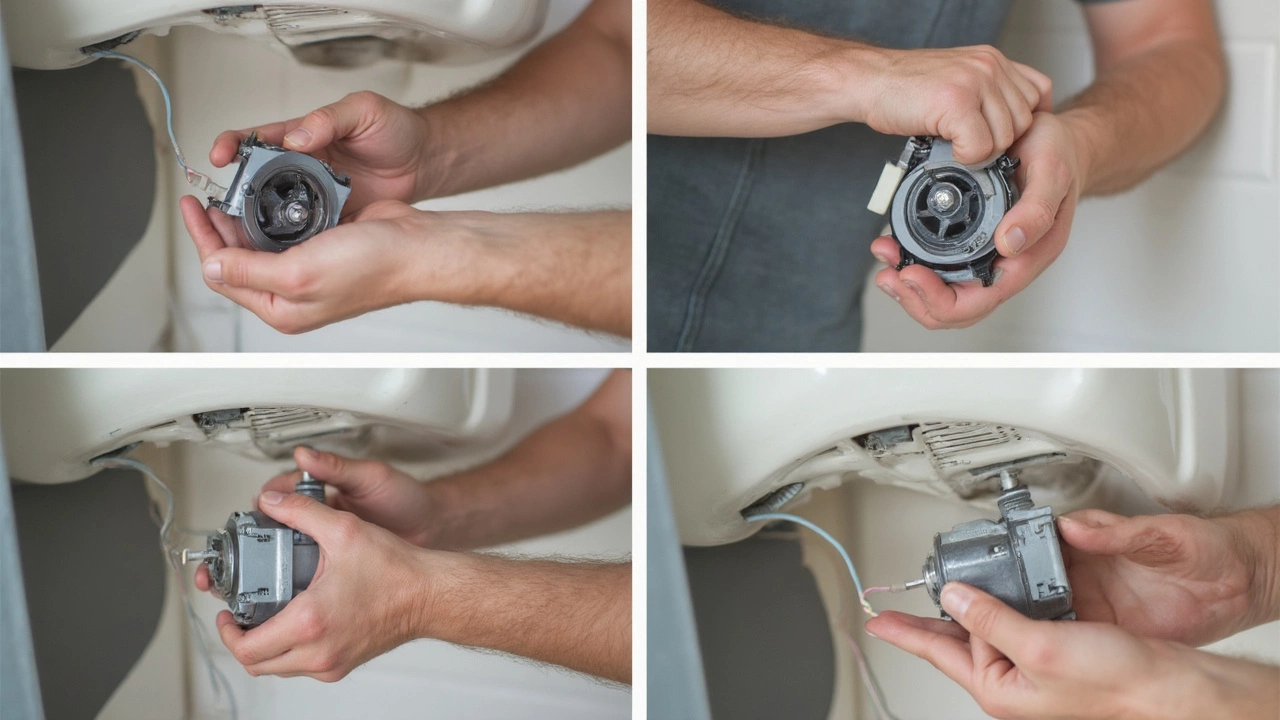
Step-by-Step Motor Replacement Guide
If your extractor fan is on its last legs because of a burned-out motor, rolling up your sleeves and tackling a motor replacement can actually be pretty satisfying—and easier than you’d think if you prep right. Here’s my straightforward, no-nonsense guide.
- Cut the Power: Head to your fuse box and fully switch off the power to the fan. This part’s serious—don’t just use the wall switch. Safety first to avoid nasty shocks.
- Pull Off the Cover: Most bathroom and kitchen extractor fans have a snap-on or screwed-in front grill. Pop it off by hand or with a screwdriver. Give it a quick wash if it’s grimy—you don’t want all that dust floating around.
- Unscrew and Remove the Fan: You’ll usually find a few screws or clamps holding the fan assembly. Keep the screws somewhere safe so you don’t lose them. Carefully lower or slide out the fan so you can see the motor inside.
- Check and Mark the Wires: The motor is hooked up with a couple of wires (often just neutral and live; older units might have earth/ground too). Snap a photo to remember where each wire goes. Label the wires with tape if you’re worried you’ll forget.
- Disconnect the Motor: Undo the wire connections. Sometimes they use screws, sometimes quick-release connectors. Gently pull the wires clear. Unscrew or unclip the motor from its housing.
- Match and Install the New Motor: Bring out your new motor (make sure it matches the make and model—some brands don’t play nice together). Slot it into place, using the same screws or clips. Reattach the wires in their original spots. Double-check everything is snug and makes solid contact.
- Test Before Reassembly: Flick the power back on for a few seconds and see if the fan runs smoothly and quietly. If it’s all good, power back off and finish up. If it doesn’t start, check those wire connections and make sure nothing’s blocking the blades.
- Reassemble and Clean Up: Bolt the fan assembly back and clip or screw the front grill on tight. Give the area a quick clean to sweep away dust and debris.
Most extractor fan repairs take about 30-60 minutes if you have all your tools and the right fan motor. Replacement motors for common brands like Vent-Axia and Manrose can cost anywhere from £25 to £80 in the UK, and most online shops list compatibility by model number.
| Brand | Typical Motor Cost (£) | Average Repair Time |
|---|---|---|
| Vent-Axia | 45-70 | 45 minutes |
| Manrose | 25-40 | 30 minutes |
| Xpelair | 40-65 | 50 minutes |
If you’re tackling a DIY fan repair, always choose a dry day if you need to access attic or outside venting. And if anything about the wiring makes you nervous, do yourself a favor and call a pro. No sense risking it for the price of a takeaway.
When to Call It Quits and Buy a New Fan
Sometimes, replacing the extractor fan motor just isn’t the fix you need. If you’ve taken the cover off and things look rusty, caked in grime, or the blades barely turn by hand, that’s a sign the whole fan may be on its last legs. Constant electrical tripping, burning smells, and water damage inside the unit are red flags it’s time to move on.
Here are situations where a fresh extractor fan makes a lot more sense than a patch-up:
- Total Cost: New fan motors can run $30-$80, but if your fan is more than 10 years old or low-end, a new fan could cost just a little more and save headaches.
- Noisy or Worn-Out Housing: If the casing rattles or is cracked, even a new motor replacement won’t quiet things down.
- Outdated or Inefficient Model: Older fans chew through more energy and struggle to keep up with newer, more efficient options on the market.
- Hard-to-Find Parts: If you can’t track down a motor for your specific model, or it’s been discontinued, that’s your answer.
Let’s look at real numbers. An average replacement fan repair (motor + labor) sits between $100-$150. For $135-$200, you might get a brand-new fan with up-to-date features and a warranty. The difference isn’t huge, especially if your current unit’s seen better days.
| Option | Avg. Cost (USD) | Typical Lifespan |
|---|---|---|
| Replace Motor | $100-$150 | 3-5 years (if fan is old) |
| New Extractor Fan | $135-$200 | 10+ years |
One more thing: If your fan’s wiring looks dodgy or there are repeated issues, bringing in an electrician is safer and probably more cost-effective long-term.