
Oven Heating Element Replacement Cost Calculator
- Costs are estimates based on New Zealand 2025 pricing.
- Professional labor rates: $80-$130/hour (typically 1-2 hours).
- DIY includes part cost + tools ($20-$40).
- Always verify the element voltage matches your oven's specifications.
When your oven stops heating evenly, the culprit is often the heating element. Knowing how much it will cost to replace a heating element in an oven can save you time, stress, and surprise bills. Below you’ll get the numbers you need, the choice between DIY and a professional, and a step‑by‑step guide if you decide to roll up your sleeves.
Quick Facts
- Typical part price in NZ: $70‑$150 for a standard 120V element, $120‑$250 for a 240V element.
- Professional labor: $80‑$130 per hour, average 1‑2hours.
- DIY total (parts + tools): $80‑$180.
- Professional total: $180‑$380.
- Common signs of a bad element: no heat, uneven hot spots, a burnt smell.
What Exactly Is a Heating Element?
In an electric oven, the heating element is a resistive metal coil that converts electricity into heat. Most ovens have two elements: a lower bake element for baking and an upper broil element for grilling. The element’s voltage rating (120V or 240V) matches your home’s supply and determines its power (usually 2‑5kW).
How Much Does the Part Cost?
Prices vary by brand, oven model, and voltage. Here’s a snapshot of the most common sources in NewZealand as of October2025:
- Manufacturer’s part number - buying direct from the oven maker guarantees a perfect fit; expect $130‑$250 for 240V models.
- Local appliance stores such as Mitre 10 or The Good Guys - they stock generic elements for popular brands; prices range $90‑$180.
- Online retailers (e.g., Trade Me, Appliance Parts Ltd) - often the cheapest option; you’ll find off‑brand elements for $70‑$140.
When you’re budgeting, add a small buffer (≈10%) for shipping or any required connectors.
Professional Labor vs. DIY: What’s the Real Difference?
| Item | DIY | Professional |
|---|---|---|
| Heating element (average) | $120 | $120 |
| Labor | $0 (your time) | $80‑$130 per hour (1‑2hrs) |
| Tools & safety gear | $20‑$40 (multimeter, gloves) | $0 (included) |
| Total estimated cost | $140‑$180 | $200‑$380 |
If you’re comfortable working with electricity and have a basic set of tools, DIY can shave $60‑$200 off the bill. However, a professional brings a warranty on workmanship and can spot hidden issues like a failing thermostat or damaged wiring.
When to Call an Appliance Repair Service
You should consider a certified appliance repair service if any of these apply:
- The oven is still under warranty - unauthorized DIY work could void it.
- You notice frayed cords, cracked insulation, or a blown fuse.
- You lack a reliable multimeter to confirm the element is truly defective.
- Your oven model uses a sealed, hard‑to‑remove element (common on built‑in wall ovens).
In most Kiwis homes, a reputable local repairer will charge a call‑out fee of $50‑$70, which is often credited toward the labor if you proceed with the repair.
DIY Replacement: Step‑by‑Step Guide
Before you start, gather these items (all available at hardware stores like Bunnings):
- New heating element matching your oven’s model and voltage.
- Flat‑head screwdriver, nut driver set.
- Multimeter (to verify continuity).
- Heat‑resistant gloves and safety glasses.
- Two‑hour “cool‑down” period for the oven.
Follow these steps. Each step includes a quick safety note.
- Disconnect power. Unplug the oven or switch off the dedicated circuit at the consumer unit. Even a brief touch can give a painful shock.
- Remove the rear panel. Most ovens have four screws securing the back cover. Keep them in a small container.
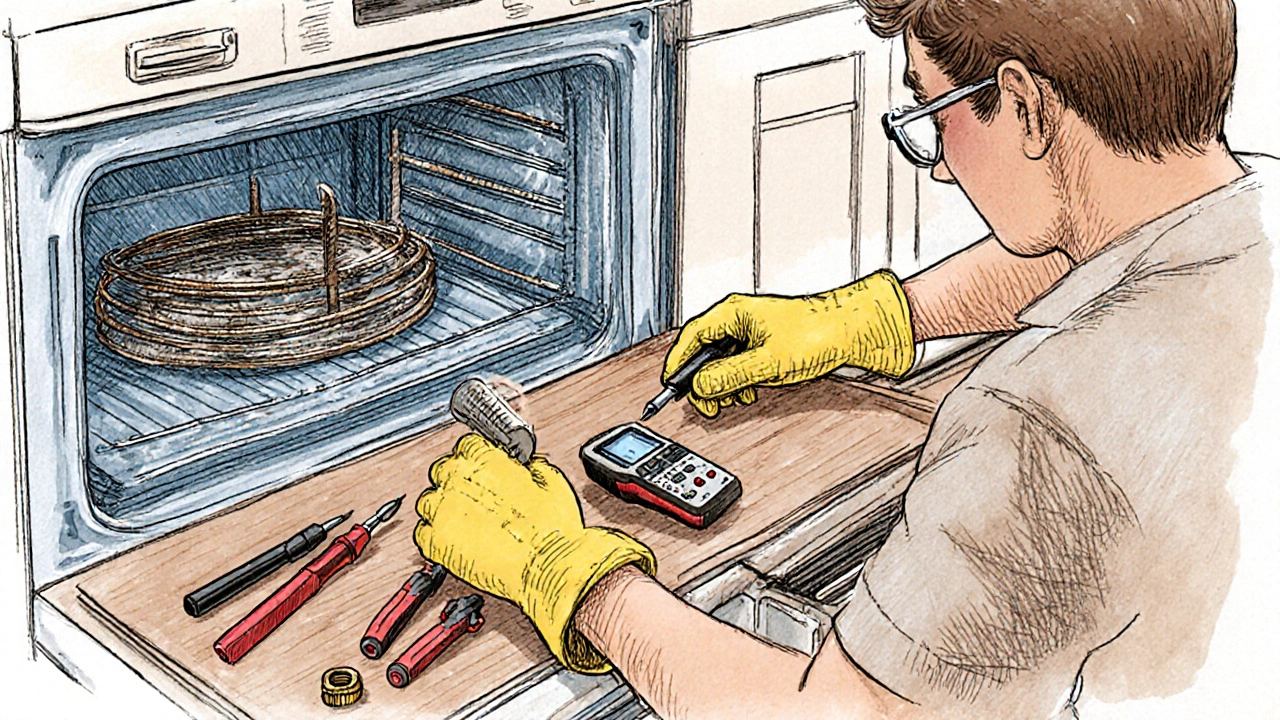
- Locate the element. The bake element is a solid metal coil bolted to the oven’s interior wall. Note how the wires hook onto the terminals - you’ll need to replicate the connection.
- Test for continuity. Use the multimeter on the ohm (Ω) setting; a working element reads between 8‑15Ω. If it reads infinite, the element is dead.
- Unscrew and pull out the old element. Gently wiggle to free it from the mounting brackets.
- Attach the new element. Align the mounting holes, secure with the original screws, and reconnect the terminal wires exactly as before.
- Re‑assemble the oven. Replace the rear panel, tighten all screws, and restore power.
- Test the oven. Set it to a low bake temperature (150°C) and watch for even heating. If the element glows red and the oven reaches the set temperature, you’re good to go.
If anything feels off-wires loose, odd smells, or the oven still won’t heat-stop and call a professional. It’s cheaper to get help than to replace another component later.
Where to Buy a Replacement Element in NZ
Here are three reliable sources, each with a brief pros‑cons snapshot:
- Trade Me - huge marketplace, often lower prices, but watch seller ratings for authenticity.
- Appliance Parts Ltd (Auckland) - specialist stock, same‑day pickup if you’re nearby, slightly higher price.
- Direct from the manufacturer (e.g., Bosch, Electrolux) - guaranteed fit, best for warranty work, but the most expensive.
When ordering, have your oven’s model number handy; it’s usually on a label inside the door frame.
Diagnosing a Bad Heating Element - Quick Checklist
Before you spend money, run through this short list:
- Does the oven heat at all? If not, the element is the most likely fault.
- Is heat uneven (hot spots on one side)? That points to a partially failed coil.
- Do you hear a buzzing sound when the oven is on? That can indicate a failing element near the end of its life.
- Any burnt odour or visible discoloration on the element? Replace it immediately.
If you confirm the element is the issue, you’ve already saved time by knowing exactly what to replace.
Bottom Line
In NewZealand, swapping out an oven heating element typically runs $140‑$180 if you do it yourself, or $200‑$380 when you hire a professional. The biggest variable is the element’s voltage and brand. By checking the symptoms, sourcing the right part, and weighing DIY confidence against warranty concerns, you can make an informed decision that protects both your wallet and your oven’s lifespan.
Frequently Asked Questions
How long does it take to replace an oven heating element?
For most standard ovens, the actual removal and installation takes about 30‑45minutes. Adding time for safety checks and re‑testing, set aside roughly 1‑2hours total.
Can I use a 120V element in a 240V oven?
No. The voltage rating must match the oven’s supply. Installing a lower‑voltage element can cause it to burn out quickly or fail to heat properly.
Is it worth repairing an old oven instead of buying a new one?
If the oven is less than 10years old and the repair cost is under $400, fixing the element is usually cheaper than replacing the whole unit. Energy efficiency gains from a new oven might tip the scales for older models.
Do I need a licensed electrician to replace the element?
If you disconnect the oven at the mains plug and follow the safety steps, a DIYer can replace the element legally. However, if you must work directly at the consumer unit, a licensed electrician is required by NewZealand law.
What warranty coverage do repair services usually offer?
Most reputable repairers give a 12‑month guarantee on parts and labour. Keep the receipt and ask for a written warranty card before the technician leaves.