Washing Machine Repair Assistant
Select the symptom you are experiencing to get immediate DIY advice.
Won't Start
Machine is silent when pressed or clicks but doesn't run.
Not Draining
Water remains in the drum after the cycle finishes.
Leaking Water
Puddles forming around the base of the machine.
Loud Noises
Jet engine sounds, grinding, or violent shaking.
Difficulty:
DIY Verdict:
Check off the tools you need to build your essential repair kit.
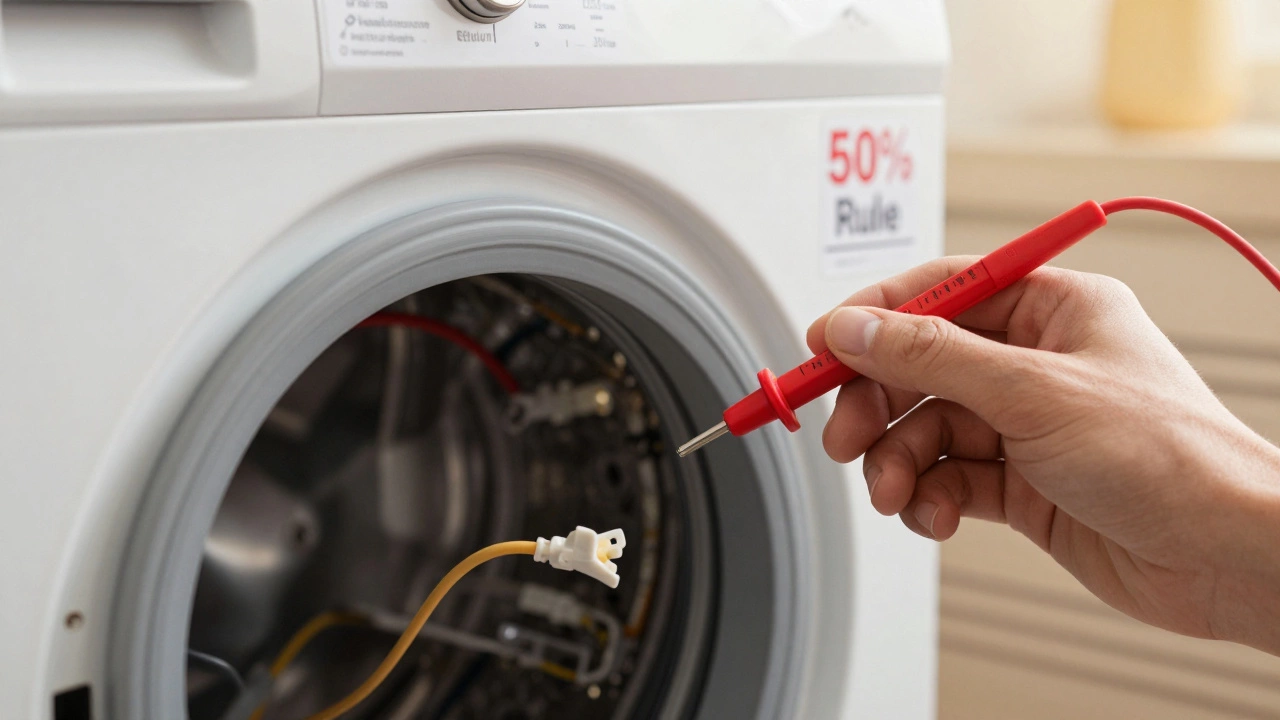
Use the "50% Rule" to determine if it's financially smart to repair your machine.
That moment when your washing machine stops spinning, starts making a noise like a jet engine, or refuses to drain is stressful. You’ve got laundry piling up, and you’re staring at this expensive box wondering if you need to throw it away or if you can fix it. The short answer is yes, you absolutely can repair many washing machine issues yourself. In fact, the majority of breakdowns are caused by simple, user-serviceable parts that cost less than $50.
However, not every problem is a quick weekend project. Knowing the difference between a clogged filter and a blown control board saves you money, time, and potential injury. This guide breaks down what you can safely handle, what tools you need, and exactly when it’s smarter to hand over the screwdriver to a professional.
What You Can Fix Yourself: The Low-Hanging Fruit
Most washing machine repairs fall into two categories: maintenance neglect and worn-out mechanical parts. If your machine is under five years old, it’s likely a maintenance issue. If it’s older, a part may have simply reached the end of its life. Here are the most common issues that don’t require an electrician or a plumber.
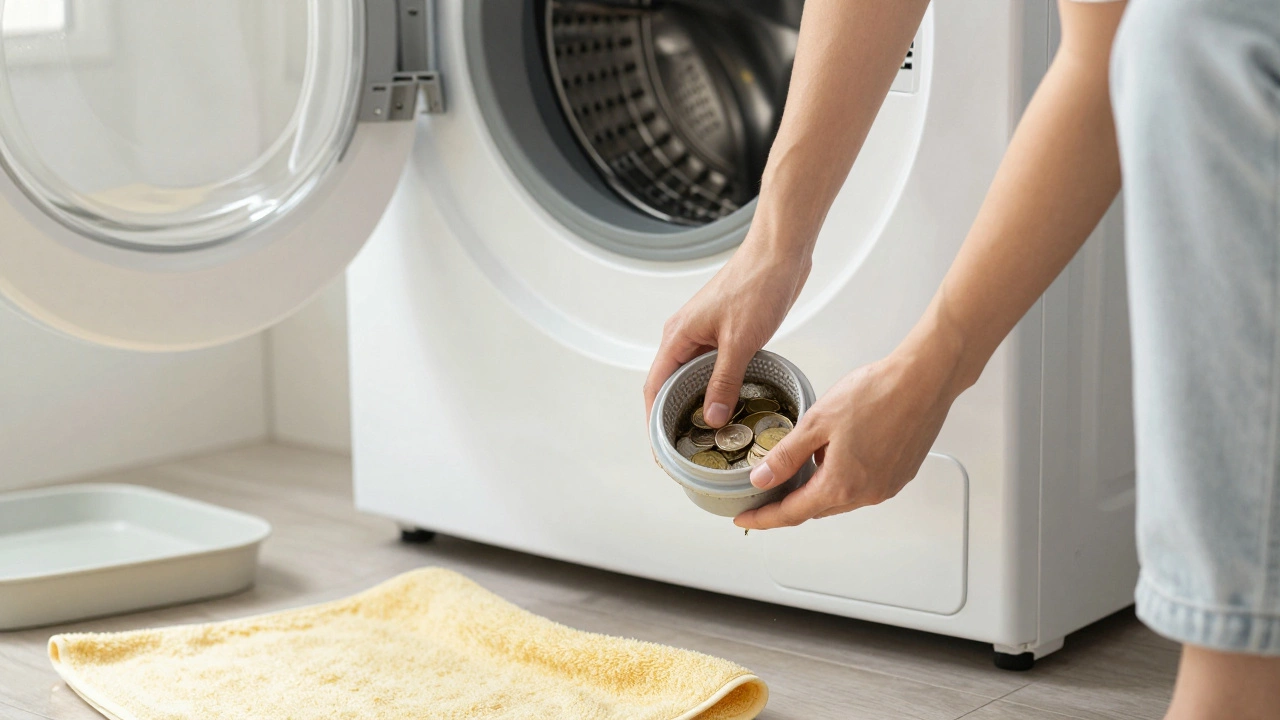
- Clogged Drain Pumps: If water isn’t draining, the pump might be blocked by coins, hair, or small clothing items. Most front-loaders have an access panel at the bottom right. Open it, place a towel down, and remove the filter. Clear out the debris, and often, the problem vanishes instantly.
- Faulty Door Latches: If the machine won’t start, check the door lock. On front-loaders, this is a plastic mechanism that engages when you close the door. If it’s broken, the machine thinks the door is open for safety reasons. Replacing the latch usually costs around $30-$60 and takes about 15 minutes with a screwdriver.
- Leaking Hoses: Check the inlet hoses at the back where they connect to the tap. Rubber degrades over time, especially in areas with hard water or temperature fluctuations. Cracks or bulges mean it’s time to swap them out. It’s a cheap insurance policy against flooding your laundry room.
- Noisy Spin Cycles: If your machine shakes violently, check the leveling feet. Uneven floors cause excessive vibration. Adjust the feet until the machine sits flat. If it still rattles, the shock absorbers or suspension springs might be worn. These are accessible on many models and relatively easy to replace if you follow a video tutorial.
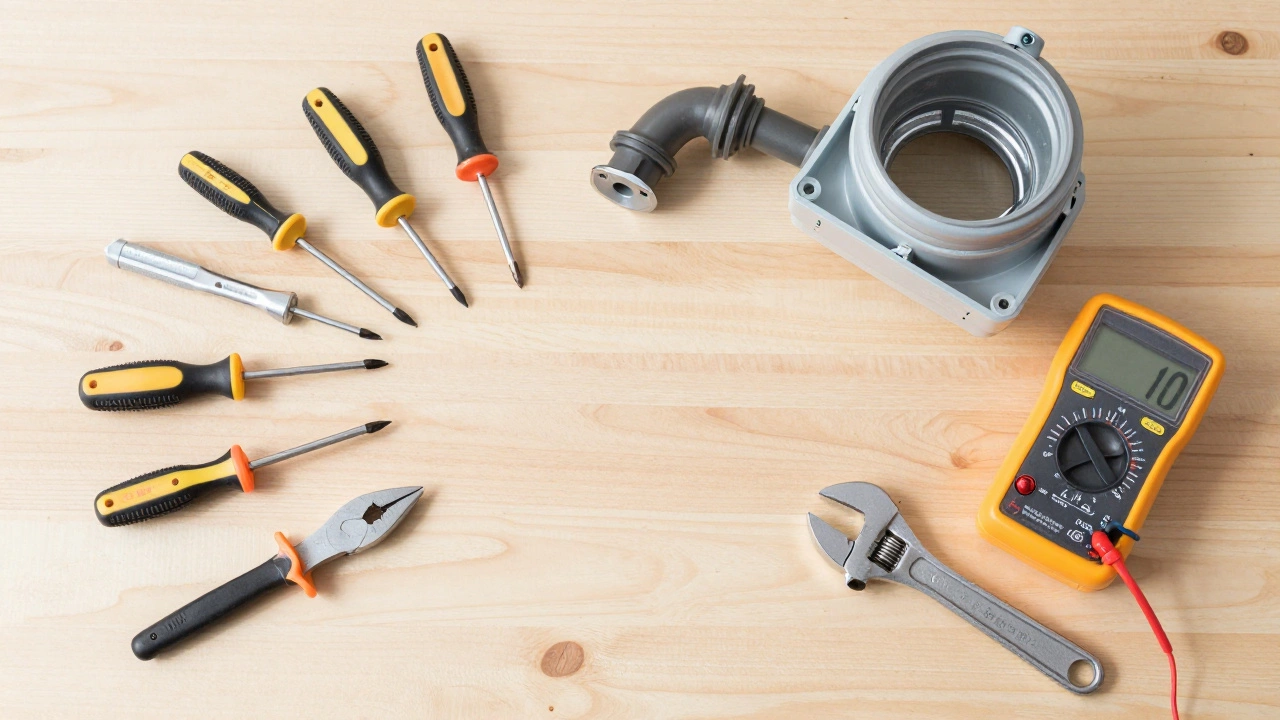
The Essential Toolkit for Appliance DIYers
You don’t need a garage full of professional equipment to fix a washer. A basic toolkit gets you through 90% of household repairs. Investing in these tools pays off quickly when you avoid service call fees.
| Tool | Why You Need It | Estimated Cost |
|---|---|---|
| Phillips and Flathead Screwdrivers | For removing panels, screws, and accessing internal components. | $15-$30 |
| Nut Drivers (1/4" and 5/16") | Washing machines use hex-head nuts extensively. Standard sockets often don't fit tight spaces. | $10-$20 |
| Multimeter | Crucial for testing electrical continuity. Tells you if a heating element, motor, or switch is dead. | $20-$50 |
| Adjustable Wrench | For loosening hose connections and larger bolts. | $10-$15 |
| Pliers (Needle-nose and Slip-joint) | For gripping small clips, wires, and pulling out filters. | $10-$15 |
Safety First: When to Stop and Call a Pro
DIY repair is empowering, but it carries risks. Electricity and water don’t mix well, and heavy appliances can crush fingers or backs if handled incorrectly. Always unplug the machine before touching any internal parts. Turn off the water supply valves too. Never assume a machine is safe just because it’s unplugged; capacitors can hold a charge.
There are specific scenarios where DIY is a bad idea. If the problem involves the main control board, the wiring harness behind the console, or gas lines (for combo units), hire a professional. These components require specialized knowledge and certification. Attempting to rewire a machine incorrectly can create fire hazards or void warranties. Also, if your machine is under warranty, opening it might invalidate that coverage. Check your manual first.
Step-by-Step: Diagnosing Common Problems
Before buying parts, diagnose the issue accurately. Guessing leads to wasted money. Here’s how to approach three frequent complaints.
1. The Machine Won’t Start
First, check the obvious: is it plugged in? Is the circuit breaker tripped? If power is present, listen for a click when you press start. No click? The door latch or the start switch might be faulty. Use a multimeter to test the door latch for continuity. If there’s no continuity, replace the latch. If the latch clicks but the drum doesn’t move, the drive belt might be broken or slipped off the motor pulley. Pull the top panel back (on top-loaders) or remove the rear panel to inspect the belt.
2. Water Isn’t Draining
Start with the drain pump filter. Locate it, usually behind a small kickplate at the bottom front. Place a shallow tray underneath to catch residual water. Unscrew the filter slowly. If it’s packed with lint, coins, or bra wires, clean it thoroughly. Reinsert it tightly. If the filter was clear, listen for the pump humming during the drain cycle. If you hear humming but no water movement, the impeller inside the pump might be jammed. If you hear nothing, the pump motor itself has likely failed and needs replacement.
3. Clothes Are Not Getting Clean
This is rarely a mechanical failure. Check your detergent usage. High-efficiency (HE) washers require low-sudsing detergent. Using regular detergent creates too many bubbles, which insulates clothes from agitation and prevents proper rinsing. Switch to HE detergent and reduce the amount by half. Also, run a cleaning cycle with vinegar or a dedicated drum cleaner to remove built-up residue from previous loads.
When to Replace vs. Repair
Not every broken machine deserves a second chance. Use the "50% Rule": if the cost of repair exceeds 50% of the price of a new, comparable model, consider replacing it. For example, if a new mid-range washer costs $800, spending $400 on a new motor and transmission isn’t wise. However, if the fix is $100 for a belt or bearing, repair is the clear winner. Also, consider the age. Machines over 10-12 years old often have multiple failing components. Fixing one issue might just reveal another next month.
Pro Tips for Long-Term Reliability
Prevention is cheaper than cure. Simple habits extend the life of your washing machine significantly. Leave the door ajar after each wash to let the drum dry out. This prevents mold and mildew smells, which are common in modern sealed units. Clean the detergent drawer monthly to prevent clogs. Run an empty hot-water cycle once a month to flush out internal residues. Finally, don’t overload the machine. Overloading stresses the bearings and motor, leading to premature failure. Follow the manufacturer’s weight guidelines strictly.
How much does it cost to fix a washing machine yourself?
Most DIY repairs cost between $20 and $100 for parts. Common fixes like replacing a door latch, drain pump filter, or inlet hose are on the lower end. More complex parts like belts, shocks, or heating elements range from $50 to $100. You save significantly compared to professional service calls, which often charge $75-$150 just for the visit, plus labor and parts markup.
Is it dangerous to repair a washing machine?
It can be if you ignore safety protocols. The main risks are electric shock, water damage, and physical strain from moving heavy parts. Always unplug the machine and turn off the water supply before starting. Be cautious of sharp metal edges inside the cabinet. If you feel unsure about any step, stop and consult a professional. Never work on a machine that is still connected to power.
Where can I find replacement parts for my washing machine?
You can find parts online through retailers like Amazon, eBay, or specialized appliance part stores like RepairClinic or PartSelect. Use the model number located on the rating label inside the door frame or on the back of the machine to ensure compatibility. Local hardware stores sometimes carry generic hoses and filters, but online sources offer a wider selection and better pricing for specific brand parts.
How long does a typical DIY washing machine repair take?
Simple tasks like cleaning a filter or replacing a hose take 15-30 minutes. Medium-complexity jobs like changing a door latch or belt usually take 1-2 hours. More involved repairs, such as replacing a drum seal or motor, can take 3-5 hours depending on your experience level. Factor in extra time for researching instructions and gathering tools.
Can I fix a leaking washing machine myself?
Yes, many leaks are DIY-friendly. Start by checking the inlet hoses for cracks or loose connections. Then inspect the drain hose for kinks or holes. If those are fine, the leak might be coming from the door boot seal (front-loaders) or the tub spider gasket. Replacing a door seal is moderately difficult but doable with patience. Internal tub leaks usually require professional disassembly and are more complex.