
Quiet isn’t the usual sound of a kitchen or bathroom. When your extractor fan dies, you notice fast—the smells linger, the mirrors fog, your kitchen fills with steam. But here’s a curveball: what if I told you swapping out that extractor fan isn’t a job for pros only? Around my place in Dunedin, folks love giving things a crack themselves. Still, you might be wondering, “Is it hard to replace an extractor fan?” Let’s shred the mystery, break down the steps, and see if you can really pull this off.
What’s Involved in Extractor Fan Replacement?
Replacing an extractor fan sounds intimidating, mostly because it yells "electrics," "mess," and "hidden screws". But what’s truly going on behind the plastic cover? Most home extractor fans—kitchen or bathroom—are either wired directly into the mains or plugged into an outlet behind the fan housing. The job involves disconnecting power, unscrewing the old unit, prepping the space, and hooking up the new one. The main headache? Old mounting holes rarely line up with new fans, and, if you're dealing with awkward wiring or brittle ducting, things can get fiddly.
You’re dealing with a bit of dust, sometimes paint, and if your house is like mine—a stubborn wall that refuses to cooperate. A key tip: before you buy a replacement, pull that old fan out and measure the cutout and electrical connections. Standard wall fans sometimes mask unique quirks from one house to another. New Zealand homes, especially older ones in Dunedin, can have weird setups hidden in their walls or ceilings (cheers, 1910s builders).
For someone handy with a screwdriver, swapping out a simple axial fan (the most common bathroom fan) might take an hour, give or take. If your extractor is integrated with a fluorescent light or humidity sensor, add complexity. Some units have built-in timers; others don’t. Make sure you match your new fan to your wiring setup. Mismatch here and you’ll be scratching your head, or worse, tripping the circuit breaker every time you flick the switch.
It's not always about brute strength. Gentle prying, patient wire stripping, and careful alignment make the real difference. If you're lucky, your old fan comes out easily and your vent and wiring are in good nick. Bad luck? You’ll be cleaning up forty years of grease or extracting brittle wires. Either way, tackling the job with a clear plan and the right tools makes it way less scary.
| Step | Estimated Time | Common Difficulty |
|---|---|---|
| Power Off/Safety Prep | 5 min | Easy |
| Remove Old Fan | 10-30 min | Varies (rusty screws) |
| Prep/Measure Opening | 5-15 min | Medium (odd shapes) |
| Wiring New Fan | 10 min | Medium (tight wires) |
| Mount New Fan | 20 min | Medium/Hard (align holes) |
Essential Tools and Materials You’ll Need
Walking into a job unprepared is just asking for pain. When I replaced the extractor in Luna’s bathroom, I ended up on three trips to Bunnings: once for the right screwdriver, once for back-up ducting tape, and finally for a wire stripper I forgot I needed. The trick? Make a checklist and double-check it before you even start.
Here’s what usually makes the cut when replacing a standard wall or ceiling extractor fan:
- Flathead and Phillips screwdrivers (you’ll need both)
- Voltage tester (always double-check wires—even if you “know” the power is off)
- Wire strippers/cutters
- Drill and assorted bits (sometimes you do need to make new holes)
- Measuring tape (not as obvious as you’d think—don’t eyeball the fan size)
- Pencil or marker (for marking new screw holes)
- Dust mask and gloves (old fans and ceilings hide nasty surprises)
- New extractor fan (preferably the same type or larger for a snug fit)
- Ducting tape or clamp (to seal the vented section, especially in kitchens)
- Step ladder (so you’re not balancing on the sink like I did… trust me, don’t do that)
In older New Zealand homes, you might also need a chisel to clear out ancient caulking, or insulation tape if the wires are cracked. And always, always have a torch handy. Those ceiling cavities swallow light like nobody’s business.
If your new unit has any ‘fancy’ features (humidity sensors, timers, built-in lighting), you’ll need to read the manual twice and lay out the mounting template before starting. Matching up wires the wrong way doesn’t just mean your fan won’t work—it could fry the whole unit.
For bathroom fans in particular, make sure you’ve got the right type (extractor vs. exhaust). Kitchens need a higher extraction rate measured in litres per second (L/s). For instance, a family kitchen typically needs 60-180 L/s, whereas a small bathroom gets by with 15-30 L/s. Nearly one in four call-backs to fan installers in the UK (according to a 2022 Rated People survey) happen because the wrong fan was fitted or the extraction flow was too weak. That’s avoidable with a quick look at the box label—and a check of your room’s air volume.
Biggest Hurdles You Might Hit
Nothing ever goes exactly as planned—especially in old houses. The main pain points for extractor fan replacement usually sit in three camps: power supply confusion, awkward physical access, and venting drama. Let’s unpack each.
Electrical wiring sounds scary, and, to be fair, it can be. Modern extractors sometimes need neutral, live, and switched live wires all present, especially for timer or humidistat models. In lots of older Kiwi homes, there’s only a live and neutral. If you don’t have what the new fan calls for, you might have to switch model, or call in a sparky—electrical code’s not a DIY-optional thing. Kiwis are pretty can-do, but you don’t want to play fast and loose with house wiring. Always use a voltage tester before mucking about with anything. Rule of thumb Luna learned: “Off at the fuse box, then check again.”
Physical access comes next. Ceilings, especially above showers or over stoves, don’t offer much elbow room. Pulling out an ancient fan stuffed with insulation or wedged behind plumbing can be a real test. Sometimes old fans are glued in, or boxed with unexpected framing. If someone got carried away with sealant or mountings 30 years ago, expect a sweaty wrestling match with the unit. Drop cloths and vacuum are your friend here, so you aren’t cleaning up ceiling flakes for weeks.
Vents can surprise you, too. Some fans vent straight outside. Others dump air into ceiling cavities (not ideal, especially with recent moisture regulations). Ducting that’s brittle or full of lint will need replacing and reconnecting. Get the right size duct clamp for the new model, and check for a good seal to avoid leaks. Bad venting setups are a leading cause of extractor failures, so check the duct length and path while you’re in there.
Here's a quirky local stat: in Dunedin, the average extractor fan life is just under 8 years—one year shorter than in Auckland—likely thanks to older housing stock and extra cold, damp winters. That means you’re not alone if your fan fails faster than expected. Humidity, salt air, and loads of use all play a part.
Safety First: Red Flags and When to Call a Pro
Some stuff you just shouldn’t tackle solo, and extractor fans cross that line sometimes. If any of these pop up, get someone certified to help:
- You see crumbling (or ancient fabric) electrical wires—touching these is risking fire or shock.
- You need to shift the whole vent location, cut a new hole in masonry or weatherboard, or rerun major ducting.
- Your house is on a shared circuit, or has complex lighting/fan combos controlled by a smart switch.
- Mold, rot, or asbestos insulation is visible when you open up the ceiling or wall. Do not disturb; call in the experts.
- The new fan’s wiring diagram is totally different from the old setup and you’re lost even after Googling.
Electrical snags are the number one reason Kiwi homeowners call in an electrician during a DIY extractor change. By law, any changes to permanent wiring in New Zealand should be signed off by a certified electrician. A simple like-for-like swap—where you’re not moving cables or adding switches—can often be DIY. But even then, double-check your local council’s rules if you’re not sure. Remember, nothing sinks your heart like a failed insurance claim because you rewired something wrong. It’s one thing to wrestle with a fan bracket; another to tangle with the fire risk.
Luna, for instance, knows she isn’t tall enough to handle the kitchen ceiling fan—climbing up there (after me, of course) is asking for a stray elbow to knock out a light fitting. If you’re working at heights or in tight corners, don’t try to be a hero alone. A mate to steady the ladder (or just laugh at your contortions) helps, but sometimes you just need someone with proper gear and know-how.

Step-by-Step Guide: How to Replace an Extractor Fan
Alright, so you’re ready to go for it yourself. Here’s the step-by-step that keeps things simple and, yes, safe. Let’s make it a breeze:
- Turn Off Power at the main circuit breaker. Use a voltage tester on the fan wires to be sure it’s dead.
- Remove the front grille or cover. Usually, it pops off with gentle pressure, or a couple of screws.
- Unscrew the mounting screws holding the fan housing to the wall or ceiling. Watch for dropped screws in the carpet or sink—trust me, they hide well!
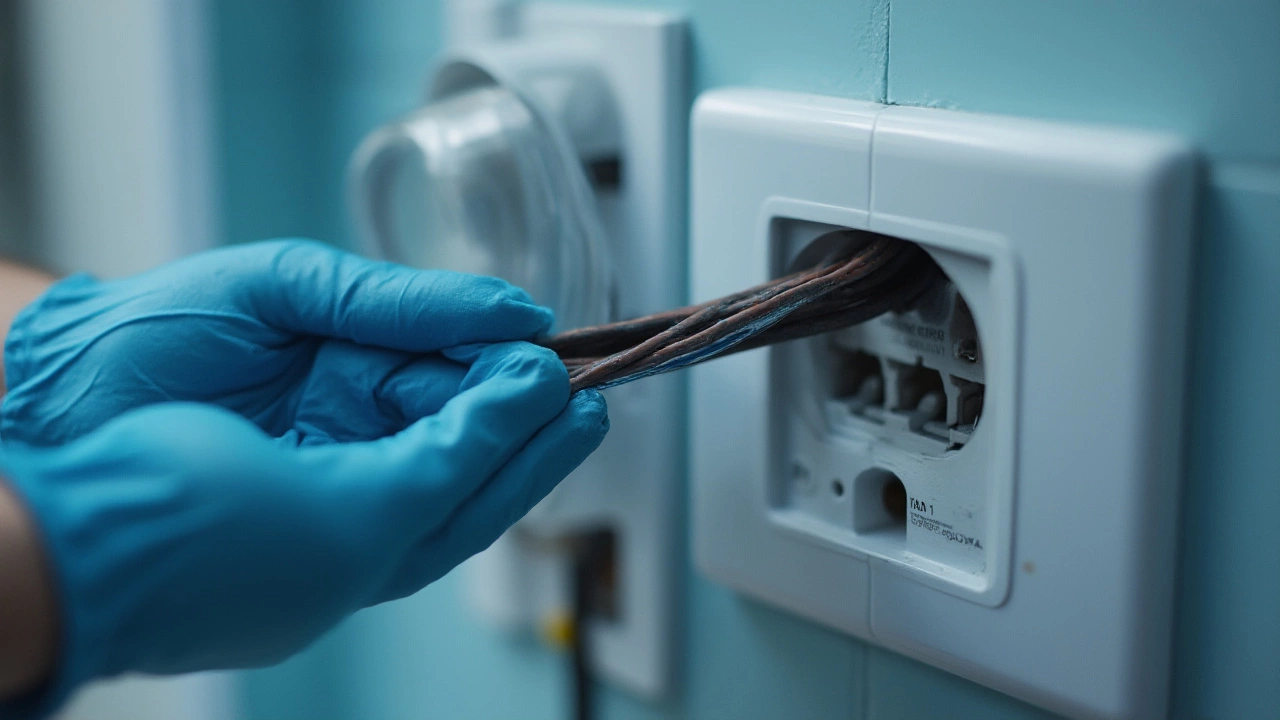
- Gently pull the old fan out. Take note of the wiring—photo time! Match each old wire to its new friend on the replacement unit.
- Disconnect wires, using a flathead to loosen the terminal screws. Carefully label if there’s a risk of muddling them up.
- Check out the vent and clear any dust, grease, or old tape. This improves airflow and prevents early breakdown.
- Prep the hole—sometimes you’ll need to tidy up sharp edges or old paint buildup, especially if your new fan is a different size.
- Attach the ducting to the new fan outlet, using a clamp or duct tape for a snug, leakproof join.
- Wire up the new fan. Match live, neutral, and, if required, timer/switch wires as per the manufacturer's diagram.
- Mount the new fan in the opening, using drill or screws to secure it. Sometimes you’ll need to make new pilot holes—the mounting holes rarely match up between brands or models.
- Fit the cover or grille. Snap-on types are fastest, but check for any loose wires or misaligned panels before you close up fully.
- Switch the power on and test. Fan should spin smoothly, and any timer or light functions should work as expected.
A little DIY trick: if you’re not sure you’ve gotten a tight vent seal, light a stick of incense and hold it near the fan when it’s running. Smoke should get sucked in and vanish—if it wafts back out, check your vent joints. This quick test beats waiting until the next cooking disaster when the kitchen fills up again!
Keep the box for your new fan and snap a photo of your wiring before and after. These details help if you need to troubleshoot or replace the unit again years down the track. You’d be surprised how much you forget about behind-the-wall stuff until you see it again.
For an average swap with easy-to-access wiring, the whole job shouldn’t take more than an afternoon—even if your DIY skills are, let’s say, “developing.” Add more time if you hit snags, or if you’re tidying up wads of spider webs and thirty-year-old dust cakes.
Need a chart? Here’s a rundown of typical extractor fan types and their best use-case, to help when shopping:
| Fan Type | Main Use | Pros | Cons |
|---|---|---|---|
| Axial | Bathrooms/toilets | Easy install, quiet | Limited airflow, shorter ducts only |
| Mixed-Flow | Kitchens/big rooms | Move lots of air, OK for long ducts | Noisier & pricier |
| Centrifugal | Older homes/long ducts | Great for venting distance, solid build | Larger, complex wiring |
If you get stuck, remember that even the “easy” jobs sometimes turn into puzzles. Grab a coffee, scroll some forums, and you’ll find you’re not alone in fighting a stubborn screw or a wonky ceiling bracket.